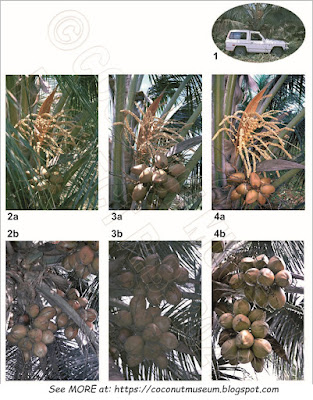
The idea of making an illustrated catalogue of coconut palm varieties was first presented by R. Bourdeix in 1993 to the COGENT Steering Committee meeting held in Montpellier, France. From the 2000s, the COGENT network, Bioversity and CIRAD worked together to develop and publish this catalogue. The document was released in 2010 under the title “Catalogue of Coconut Conserved Germplasm”. It has since inspired initiatives, since a book entitled “Varieties and forms of coconut trees in French Polynesia”, designed according to the same model, will be published in 2022.
The COGENT catalogue required photographs of coconut trees and coconuts in more than twenty countries. Its realization showed that the procedure for producing good quality coconut photos is as difficult as a complex laboratory protocol. During the development of this catalogue, illustrated guidelines were conceived and sent to participating members, which described the procedures for making standardized photos requested for figures. The main elements of these guidelines are given below.
Resources needed
- Harvest hook
- Bamboo metre scale
- Digital camera with 300mm zoom lens and electronic flash capable of taking pictures of at least 1500 x 2500 pixels. For paper printing, most of the final pictures are in the CYMK mode (Cyan, Magenta, Yellow and Black), with a resolution of 300 pixels per inch (or 118.1 pixels per cm) and a size of 13x18 cm.
- 12m aluminium ladder and/or trained coconut climber
- Manual and electric saw
- Nut drying rack (thick piece of wood with nails)
- Two workers for sawing, and hanging fruit
- Mixture of water and lemon juice (copra cleaning fluid)
- Scissors
- Copra photo platform: A plywood sheet of 1.5 m x 1.8 m, with thickness of 20 to 30 mm covered with grey-blue fabric. Any available medium tone clean grey-blue fabric can fit, as the pictures will be further digitally processed. Hammer 12 large nails (about 10 cm long) into the back of the plywood sheet (at distances as shown) to hold the fruits as indicated in Figure 3 (see following pages). A 20-cm scale and a tag with the international name of the variety are added to the lower part.
- De-husked nut photo platform: Another plywood sheet (0.5 m x 1 m x 10 to 20 mm), covered with grey-blue fabric, pieces of plastic tubes (10 to 15 cm in diameter and 2 to 5 cm long) may be used to hold the coconuts. A 10-cm scale is added to the lower part (see Figure 4).
- Coconut eye cleaning-brush (toothbrush)
- Light-reflector: Two in situ white painted walls, forming a reflective corner; or 2 white-painted 1 m x 1 m plywood sheets; or 2 large white umbrellas.
- Photo-editing software
- Select an appropriate, representative true-to-type palm, ideally 10 to 12 years of age, and if possible, bearing more than 60 fruits, such as the palm presented in photos 1 and 2. It is preferable to portray healthy and productive coconut palms, as the idea of photographing an “average palm” is inappropriate: the same palm may bear a quite variable number of fruits according to seasons and years.
- Remove the old, dry leaves and weeds around the palm. By using a harvest hook, or by climbing to the palm crown, cut also two to three leaves (as close to the stem as possible), in the direction of the photographer, so the bunches and fruits are clearly visible from the ground.
- Avoid taking the photograph in the middle of the day, when the light reduces image quality, as shown in photo 3. Wait for a clear, sunny day, and go to the site at 7 am or 5 pm, according to the side of the palm that was prepared (see step 2) for being photographed. At these times of day, a golden, flat light should come from behind the photographer allowing for sharp photos, with bunches well illuminated and a blue sky as background, such as on photo 4.
- The base of the stem and the ends of the leaves must be visible in the photo, in order to have a complete view of the palm.
- From an ethnological point of view, and to make your picture alive, it is better for somebody - for instance the farmer or a member of his.her family to be in the picture; but in front of and hiding the stem, on the side of the stem.
A tip as precious as gold...
The trick explained below is not only valid for taking photos of coconut trees, if you apply it all your landscape photos will be improved! Here is the secret: wait for the passing cloud. Without a cloud, the light is too harsh; once the cloud is installed, the light is too flat. But just when the cloud arrives or leaves, the light becomes magical and it is the precise moment to take the photo! look at your shadow, when it's in between, press the shutter button!
- For palms less than 12-years old, it is possible to make some of the photos from the ground or even standing on the roof of an (old) car, as shown in photo 1.
- For taller palms, researchers and technicians generally use aluminium ladders to reach an altitude up to 12 m. If ladders are not available a coconut climber can be trained as follows:
- Climb the selected palm
- Clean it by cutting two leaves and a few leaflets from the other leaves.
- Climb down.
- Climb the closest neighbouring palm, well oriented to take the photo.
- Use a good camera with a minimum of 300 mm zoom lens, as generally a distance of 8 to 10 m separates the palms

